Virtual Makeup In a Snap tutorials
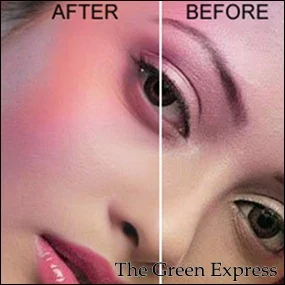
Today I share this tutorial for teach you how you can quickly and effectively modify an image where too much makeup’s were applied making the skin look fake. Keep in cool mind and try this, Makeup always not the case, the picture can be a magazine scan creating excessive noise on the picture. You can also do this to an old photographs that was scanned. Basically to any picture that has excessive amount of noise.
Now using this quick dirty secret,
save this picture and open with Photoshop to follow through the tutorial.
Step 1: I’ll assume you already have selected your models picture, using the above picture or the picture you would like to enhance. Now, look over at your layers menu, right click over your image layer and select “Duplicate Layer”. It should look something like this:
Step 2: Make sure your new duplicated layer is selected on the layers menu then from the top menu, go to FILTER -> NOISE -> REDUCE NOISE.
Step 3: You’ll get a popup dialogue box with many options and sample of your picture on the left. The menu on the right would look like the screen below. Strength is how powerful the noise reduction will be,
Once you will the REDUCE NOISE filter is applied on the top duplicated layer, your picture would look something like this..
Notice that noise is removed from all part of the image including the lips, eyes and hair.. thus making the picture look as if it has been Photoshopped.
Step 4: Remember, you have our original picture intact on the bottom of this layer. At this point our goal is to bring the original eyes, hair and lips back as if they were vivid and not blurry Photoshopped version. From the Navigator menu, select the Eraser tool.

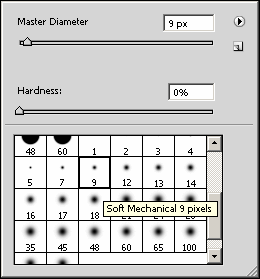
Step 5: Now, right click anywhere in the picture and you will get this popup menu.

You’ll see many different brush size, the first half set of brushes are regular brushes which we will not use. The second half set of brushes are smooth edge like spray painting like brushes. For my image
I’ve selected Soft Mechanical 9 Pixel size. You can see it more clearly in the above dialogue box. The purpose here is to carefully erase the eyeballs, eyebrows, lips and hair. As you erase them
in this layer, you’ll notice the original version is coming out replacing the newer one. This way it looks more authentic and real. Go ahead and carefully finish up erasing only inside of the eyes and other
element you would like to keep as authentic. If the model have any jewelry, it is strongly suggested you erase them as well as any other details you want to preserve from the original keeping the skin intact.
Once you are finished, it should look something like this:


-wmet_thumb.jpg?imgmax=800)


Post A Comment:
0 comments:
Thank you for your valuable Comment